Propagation
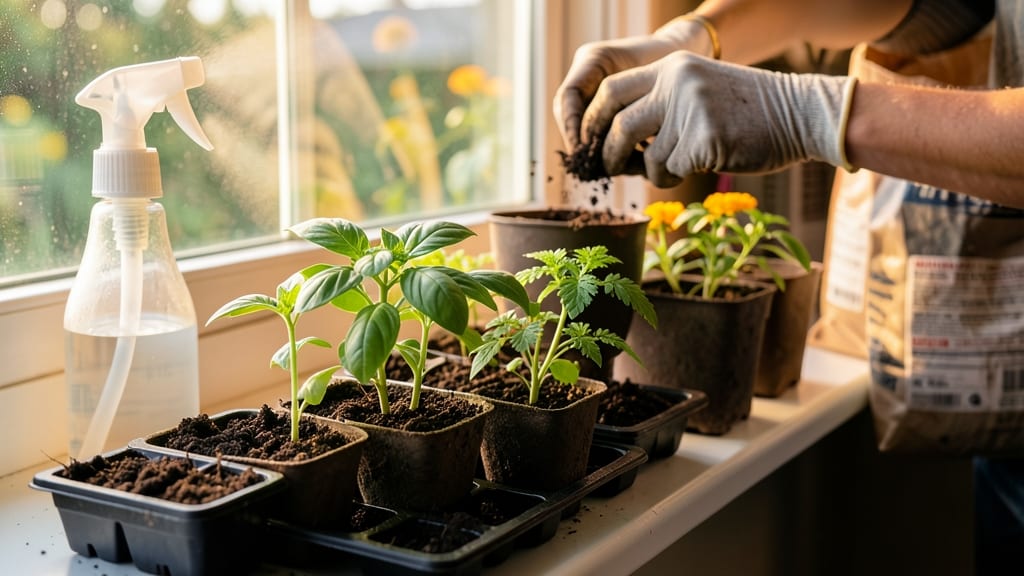
The right potting soil for seed starting makes all the difference between fast germination and weeks of waiting. 🌱 I’ve learned that store-bought garden soil is a no-go—it’s too dense, holds too much moisture, and smothers tiny roots.
What you need instead is a lightweight loam mix designed to cradle seeds while encouraging quick root development.
This specialized blend typically includes peat moss or coco coir for moisture retention, perlite or vermiculite for aeration, and sometimes worm castings for gentle nutrition. The texture should be fine and fluffy—like crumbled cake—so it doesn’t compact when wet.
For delicate seeds like snapdragons or petunias, a finer mix works best, while heartier veggies (think tomatoes or peppers) can handle slightly coarser blends.
Once you’ve got your mix ready, sterilize it to kill any lurking pathogens or pests—just spread it on a baking sheet and pop it in the oven at 200°F for 30 minutes. The result?
A sterile, sterile, sterile environment where your seeds can focus on sprouting instead of fighting off mold or disease. Moisture control is key too: keep it damp but never soggy, or you’ll risk damping-off, a fungal nemesis of seedlings.
Pro tip: Mix in a handful of sand or perlite if your blend feels too heavy, and always use fresh soil for each new batch—old soil can harbor hidden problems.
With the right mix, you’ll see those first green shoots breaking through the soil in just 3-7 days, depending on the plant. That’s the magic of starting with the perfect foundation!
📚 In This Guide
- What you need
- Instructions
- Tips and common mistakes
- Wrapping up and next steps
What you need
- ● Seed-starting potting mix (sterile & lightweight): 1–2 bags (1–2 cubic feet) per seed tray or pot. Look for labels like "seed-starting mix," "soilless mix," or "peat-based blend" (avoid garden soil—it’s too dense!).
- ● Containers: Seed trays (with or without drainage holes) or small pots (3–4 inches deep). Reuse plastic containers (yogurt cups, egg cartons) for budget-friendly options!
- ● Drainage layer: Small pebbles, perlite, or vermiculite (1/4 inch layer at the bottom of containers).
- ● Watering can or spray bottle: With a fine nozzle to avoid disturbing seeds.
- ● Seeds: Your chosen varieties—check seed packets for planting depth!
- ● Grow lights or sunny windowsill: 12–16 hours of light daily (grow lights are ideal for consistent results).
- ● Humidity dome or plastic wrap: Retains moisture for delicate seedlings.
- ● pH testing kit: Ensures your mix is in the ideal range (5.8–6.2 for most seeds).
- ● Fertilizer (low-dose): A balanced, water-soluble fertilizer (5-10-5 ratio) for later stages.
- ● Heat mat: Speeds up germination for slow starters like peppers or tomatoes.
- ● Labels & markers: Track seed types and planting dates!
How to choose and prepare potting soil for seed starting
Fast root development starts with the right mix—here's how to pick and prep it perfectly.
🌱 Step 1: Select a Sterile, Lightweight Seed-Starting Mix
Skip garden soil or potting mix labeled for general use—these compact easily and block airflow. Instead, choose a sterile seed-starting mix with 50-70% peat moss or coconut coir as the base. Look for labels specifying fast-draining and low nutrient content (you'll add fertilizer later). The ideal texture is fluffy and airy, like crumbled styrofoam—it should barely hold its shape when squeezed.
I avoid mixes with perlite or vermiculite pre-mixed in. While they improve drainage, you can add them yourself later to customize the blend for your specific seeds. For example, delicate seedlings like snapdragons benefit from extra perlite, while root crops like carrots need a slightly denser mix. Always check the bag's expiration date—older mixes lose their fluffiness and may harbor pathogens.
🌿 Step 2: Customize the Mix for Faster Germination
For fast root development, blend your seed-starting mix with 20% perlite or vermiculite by volume. This creates air pockets that prevent compaction and encourage rapid root growth. I use a 1:4 ratio of perlite to mix—for example, 1 part perlite to 4 parts seed-starting mix in a 5-gallon bucket. Mix thoroughly until evenly distributed, then moisten gently with warm water until it reaches the consistency of a damp sponge.
Here's the thing—don't overwater now. You want the mix damp but not soggy; excess moisture triggers damping-off disease before seeds even sprout. Test by squeezing a handful: water should bead on the surface but not drip through your fingers. For seeds that need darkness to germinate (like basil), press the mix firmly into the container to eliminate air pockets that could prevent contact with moisture.
☀️ Step 3: Prep Containers and Layer for Optimal Drainage
Fill your seed-starting containers 1 inch below the rim with the prepared mix, then tap gently on the table to settle it without compacting. For plastic trays, add a 1/4-inch layer of coarse sand or perlite at the bottom first—this prevents clogged drainage holes and root rot. If using biodegradable pots, skip this step; their porous material mimics natural soil conditions perfectly.
Don't skip the drainage layer in regular pots. I've seen seedlings drown overnight because water pooled at the bottom. After filling, run a finger 1 inch deep into the mix—it should feel uniformly moist but not wet. Place containers in a shallow tray to catch any excess water during your initial watering, then let them sit for 24 hours before sowing. This pre-settling period ensures the mix stabilizes and eliminates any hidden air pockets that could delay germination.
⏰ Step 4: Maintain Moisture Without Overwatering
After sowing, water gently using a spray bottle or fine-mist setting on your watering can. Aim for the container walls to avoid disturbing seeds. The goal is to keep the top 1/2 inch of soil consistently moist—not soggy, not bone-dry. For most seeds, this means watering every 2-3 days until you see the first true leaves emerge. Use a thermometer to monitor soil temperature; ideal germination ranges from 65-75°F.
Watch for condensation on the container walls—this is your signal the moisture level is perfect. If you notice mold or fuzzy growth on the soil surface, you're overwatering. In this case, remove the top 1/4 inch of soil and replace it with fresh, dry mix. The key to fast root development is consistent moisture without suffocating the seeds. Once seedlings emerge, reduce watering slightly—you'll see them respond by growing stronger and faster.
Tips & tricks for perfect potting soil mixes
Here's what nobody tells you about creating the ideal seed-starting environment—these details make all the difference for speedy germination.
Mix Customization: The 20% perlite or vermiculite ratio in Step 2 is your secret weapon for fast root development. For seeds like lettuce that need extra moisture retention, reduce perlite to 15% and increase the seed-starting mix to 85%. The key is balancing aeration with moisture—think of it like giving roots room to breathe while keeping them hydrated. I've found that pre-mixed bags often contain too much perlite, which can dry out too quickly for delicate seedlings.
Temperature Matters: That 24-hour settling period in Step 3 isn't just about eliminating air pockets—it's also giving you time to monitor soil temperature. Place your seed trays on a heat mat set to 75°F for the first 48 hours after sowing. This consistent warmth triggers faster germination, especially for slow starters like parsley. I keep a small infrared thermometer handy to verify the temperature stays in that sweet spot—nothing kills enthusiasm faster than waiting weeks for seeds to sprout.
Container Selection: Don't overlook the material of your seed-starting containers. Plastic trays conduct heat better than ceramic, which can be crucial for maintaining that 65-75°F germination range mentioned in Step 4. For seeds that need darkness to germinate (like basil), use opaque containers or cover them with black plastic wrap—light exposure can trigger premature sprouting above soil level, which weakens seedlings. I've had great success with clear plastic domed propagators for most seeds because they create a mini greenhouse effect while still allowing light penetration.
Pro Tips for Potting Soil For Seed Starting
- Here's what nobody tells you about creating the ideal seed-starting environment—these details make all the difference for speedy germination.
- Mix Customization: The 20% perlite or vermiculite ratio in Step 2 is your secret weapon for fast root development.
- Temperature Matters: That 24-hour settling period in Step 3 isn't just about eliminating air pockets—it's also giving you time to monitor soil temperature.
Frequently asked questions
Got questions about the best potting soil for seed starting? You’re not alone! Whether you’re a seasoned gardener or just starting out, these common queries can help you get it right the first time. Let’s dive in.
What’s the difference between potting soil and regular garden soil for seed starting?
Regular garden soil can be too dense, compact, and packed with weeds or pathogens. Potting soil for seed starting is lightweight, sterile, and formulated to promote fast root growth and drainage. It’s designed to stay loose and airy—perfect for tiny seeds that need space to sprout without suffocating.
When is the best time to use seed-starting mix instead of regular potting soil?
Always use a seed-starting mix when sowing seeds directly into containers. Once seedlings develop their first true leaves (about 2-4 weeks in), you can transition them to a regular potting mix for transplanting. The seed mix is too delicate for mature plants but ideal for fragile sprouts.
Can I make my own seed-starting mix at home instead of buying it?
A simple DIY mix combines 50% peat moss or coco coir (for moisture retention), 30% perlite or vermiculite (for aeration), and 20% compost or worm castings (for nutrients). Sterilize the mix by baking it at 200°F for 30 minutes to kill weeds and pathogens. Just avoid heavy garden soil—it’s too dense!
Why do my seeds rot or mold in the potting mix? What can I fix?
Overwatering, poor drainage, or a mix that’s too dense are the usual culprits. Fix it by:
- Ensuring your containers have drainage holes.
- Using a sterile, lightweight mix (never reuse old soil).
- Watering only when the top inch feels dry.
- Adding perlite or sand to improve aeration if needed.
How long can I reuse potting soil for seed starting?
Ideally, never reuse potting soil for seeds—it can harbor diseases, pests, or depleted nutrients. After one use, compost the old mix or repurpose it for transplanting only. For seeds, fresh, sterile mix is always the best bet to avoid setbacks.
Wrapping up and next steps
Choosing the right potting soil for seed starting is your first step toward strong, healthy seedlings! A lightweight, well-draining mix packed with organic matter sets the stage for fast root growth and vibrant plants. Whether you’re growing veggies, flowers, or herbs, the key is consistency—moisture retention without soggy messes. 🌱✨
Now that you’re armed with the best practices, it’s time to roll up your sleeves and get planting! Start small with a few seeds, experiment with mixes, and watch your green thumb grow. Happy gardening—your future garden will thank you! 🌿💚