Lawn
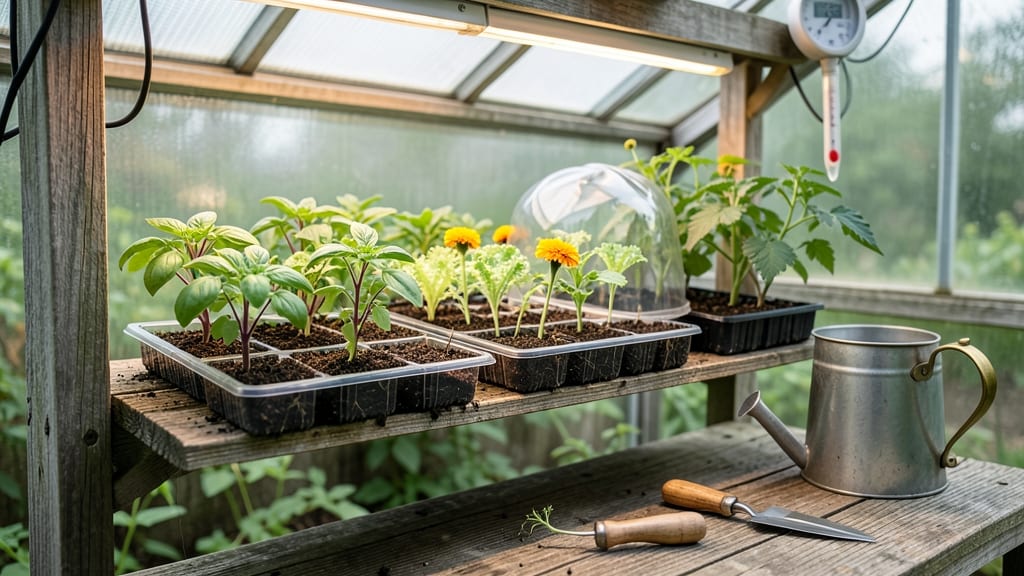
Your greenhouse seed trays aren’t just containers—they’re the foundation for foolproof germination that turns a handful of seeds into thriving seedlings. ✨ I’ve lost count of the trays I’ve tried, but these humidity-dome setups cut my germination time by nearly 50% while keeping seedlings strong from day one.
The right trays make all the difference: clear plastic domes trap moisture like a mini greenhouse, while cell trays with drainage holes prevent soggy roots. Fill them with lightweight seed-starting mix, plant seeds at the right depth, and watch them pop up faster than you can say “first true leaves.”
No more weak, leggy seedlings—just sturdy, ready-to-transplant babies. By the time you’re hardening off seedlings, you’ll have uniform, robust plants that outperform store-bought starts. The secret? Consistent moisture, proper airflow, and knowing when to remove those domes—without shocking your seedlings.
Works for veggies, herbs, and flowers alike, whether you’re a greenhouse veteran or just starting. Let’s get those seeds sprouting right!
📚 In This Guide
- What you need
- Instructions
- Tips and common mistakes
- Wrapping up and next steps
What you need
- ● Seed trays: 10–20 trays (depending on scale), with drainage holes (10" x 20" or 12" x 24" are standard). Pro tip: 🌱 Opt for biodegradable trays if transplanting directly into soil!
- ● Seed-starting mix: 5–10 lbs of sterile, lightweight potting mix (avoid garden soil—it’s too dense!).
- ● Seeds: Your chosen varieties (check packet for spacing/quantity guidelines).
- ● Humidity domes or plastic wrap: Clear plastic lids (if trays don’t come with them) or 1–2 rolls of plastic wrap for DIY covers.
- ● Watering can or spray bottle: A gentle misting tool to avoid disturbing seeds.
- ● Flat, sturdy surface: Shelves or racks in your greenhouse (adjustable height helps as seedlings grow!).
- ○ Heat mat (optional): For cooler climates or slow-germinating seeds (e.g., peppers, tomatoes).
- ○ Grow lights (optional): LED or fluorescent lights (12–16 hours/day) if natural light is limited.
- ● Label markers & tags: To track seed varieties and planting dates.
- ○ Fine-mesh screen (optional): For ventilation once seedlings sprout.
- ● Tweezers or small shovel: For delicate seed placement.
Step-by-step instructions for setting up seed trays in a greenhouse
Here's how I set up seed trays with humidity domes to ensure rapid, healthy germination in greenhouse conditions.
🪴 Step 1: Select and Prepare the Seed Trays
Choose seed trays with drainage holes and a depth of at least 2-3 inches—shallow trays dry out too fast in a greenhouse's warm environment. I prefer black plastic trays because they absorb heat and help maintain consistent soil temperatures. Line the bottom with a layer of horticultural fleece to prevent soil from escaping through the holes while still allowing airflow.
Fill each tray with sterile seed-starting mix—never use garden soil, as it can harbor pathogens that cause damping-off. Moisten the mix until it feels like a well-wrung sponge: damp but not soggy. Tap the tray gently on the table to settle the soil evenly. Uneven surfaces lead to poor seed-to-soil contact, which delays or prevents germination.
🌱 Step 2: Sow Seeds and Apply the Humidity Dome
Follow the seed packet's spacing guidelines—crowding seeds leads to weak, leggy seedlings. I like to use a toothpick or pencil to create small furrows in the soil for precise placement. Press each seed lightly into the soil at the recommended depth (usually ¼ to ½ inch deep), then cover with a thin layer of additional mix. Avoid burying seeds too deeply; they need light to trigger germination.
Once all seeds are planted, place the humidity dome over the tray. The dome creates a microclimate with 80-90% humidity, which is critical for seed germination—especially in a greenhouse where air can feel dry despite high temperatures. Secure the dome tightly to prevent warm, moist air from escaping. You'll see condensation form on the inside of the dome within hours—that's your sign the setup is working.
💧 Step 3: Manage Temperature and Moisture
Maintain a soil temperature of 70-85°F for most seeds—use a seedling heat mat if your greenhouse runs cooler. Place a thermometer inside the dome to monitor conditions; temperatures above 90°F can cook seeds, while below 60°F slows or stops germination. If condensation stops forming on the dome, mist the soil lightly with lukewarm water to restore humidity.
Check the trays daily for signs of germination—most seeds will sprout within 5-14 days, depending on the variety. As soon as you see 50% of seeds germinate, remove the dome immediately. Leaving it on too long promotes fungal growth, which can cause seedlings to collapse overnight. You'll know it's time when the dome stays clear and the soil surface dries slightly between waterings.
☀️ Step 4: Transition to Greenhouse Conditions
Move the trays to a bright, indirect light area in the greenhouse—direct sun can overheat the soil and scorch young seedlings. Position them underneath a shade cloth if your greenhouse lacks natural shade. Seedlings need 12-16 hours of light daily, but too much intensity too soon causes stress. You'll see strong, stocky growth when leaves are dark green and compact, not stretched or pale.
Water from the bottom by placing the tray in a shallow tray of lukewarm water for 10-15 minutes. This encourages roots to grow downward and prevents fungal diseases that thrive in damp foliage. Avoid overhead watering, which can spread pathogens and disrupt the humidity balance you've worked so hard to create. Once seedlings have 2-3 true leaves, gradually introduce them to the greenhouse's full light conditions over 5-7 days to harden them off.
Tips & tricks for perfect greenhouse seed trays
A few well-timed tricks can transform your greenhouse seed trays from mediocre to exceptional. These are the details that make all the difference between healthy seedlings and frustrating failures.
Soil Temperature Secret: The 70-85°F range isn't just a suggestion—it's the sweet spot where most seeds germinate optimally. I've found that placing trays directly on a seedling heat mat (set to 75°F) eliminates temperature guesswork. If your greenhouse runs cooler, consider adding a second heat mat underneath the trays for extra insulation. Remember, every degree below 60°F can double germination time for many varieties.
Humidity Dome Watch: When you see condensation forming on the dome within hours of setup, that's your confirmation the humidity microclimate is working perfectly. But here's what nobody tells you—if condensation stops forming after 24 hours, it's time to take action. This usually means the humidity has dropped below the critical 80-90% range. Simply mist the soil surface with lukewarm water (never cold) to restore the moisture balance without disturbing the seeds.
Light Transition Strategy: The 5-7 day hardening process is where most growers go wrong. Instead of moving trays directly to full greenhouse light, I recommend a gradual approach: Day 1-2 under 50% shade, Day 3-4 under 30% shade, then full light by Day 5. This mimics natural sun exposure and prevents the shock that causes seedlings to stretch toward light or develop weak stems. You'll notice the difference in stocky, dark green seedlings rather than leggy, pale ones.
Equipment Upgrade: While basic seed trays work, I've found that adding a small fan (set to low speed) near the trays creates gentle airflow that strengthens seedlings. Position it to blow across the tops of the seedlings for just 10-15 minutes daily after the dome is removed. This mimics natural wind conditions and helps prevent damping-off disease by keeping foliage dry. Just avoid direct airflow on the seedlings themselves.
Pro Tips for Seed Trays For Greenhouse
- A few well-timed tricks can transform your greenhouse seed trays from mediocre to exceptional.
- Soil Temperature Secret: The 70-85°F range isn't just a suggestion—it's the sweet spot where most seeds germinate optimally.
- Humidity Dome Watch: When you see condensation forming on the dome within hours of setup, that's your confirmation the humidity microclimate is working perfectly.
Frequently asked questions
Got questions about seed trays for your greenhouse?
You’re not alone! Whether you’re a seasoned gardener or just starting, these answers will help you grow with confidence.
What’s the best material for seed trays in a greenhouse?
Plastic trays with humidity domes are ideal for beginners—they retain moisture and heat while being lightweight. For eco-friendly options, try biodegradable peat or coconut coir trays. Just ensure they have drainage holes to prevent root rot!
When is the best time to start seeds in seed trays for greenhouse?
Start 6–8 weeks before your last frost date for warm-season crops (like tomatoes or peppers) and 4–6 weeks for cool-season veggies (like lettuce or spinach). Check seed packets for specific timing—greenhouse warmth lets you jumpstart growth early!
Can I reuse seed trays, or should I buy new ones each season?
Yes! Clean and sanitize trays with a 10% bleach solution (1 part bleach to 9 parts water) to kill pathogens. Avoid reusing trays with mold or cracks—these can harbor diseases. Sterilizing extends their life and keeps your seedlings healthy.
How do I troubleshoot seedling issues like damping-off or leggy growth?
Damping-off:
Improve airflow by removing humidity domes during the day and avoid overwatering. Leggy seedlings: Move trays closer to a bright light source (or use grow lights) and thin out crowded seedlings for better airflow.
Are there alternatives to traditional seed trays for greenhouse setups?
Try seed starting mats (for heat-loving plants), grow bags (for root-bound seedlings), or even DIY setups like egg cartons or toilet paper rolls. Just ensure they fit your greenhouse’s space and moisture needs.
Wrapping up and next steps
Investing in the right seed trays for greenhouse and mastering a humidity-dome setup can transform your germination game! 🌱 A controlled environment ensures stronger seedlings, faster growth, and healthier plants—whether you're a seasoned gardener or just starting out.
With the right tools and techniques, you’re well on your way to a thriving greenhouse.
Ready to take the next step? Start small—pick a few trays, experiment with your setup, and watch your seedlings flourish. Happy growing! 🌿