
Lawn
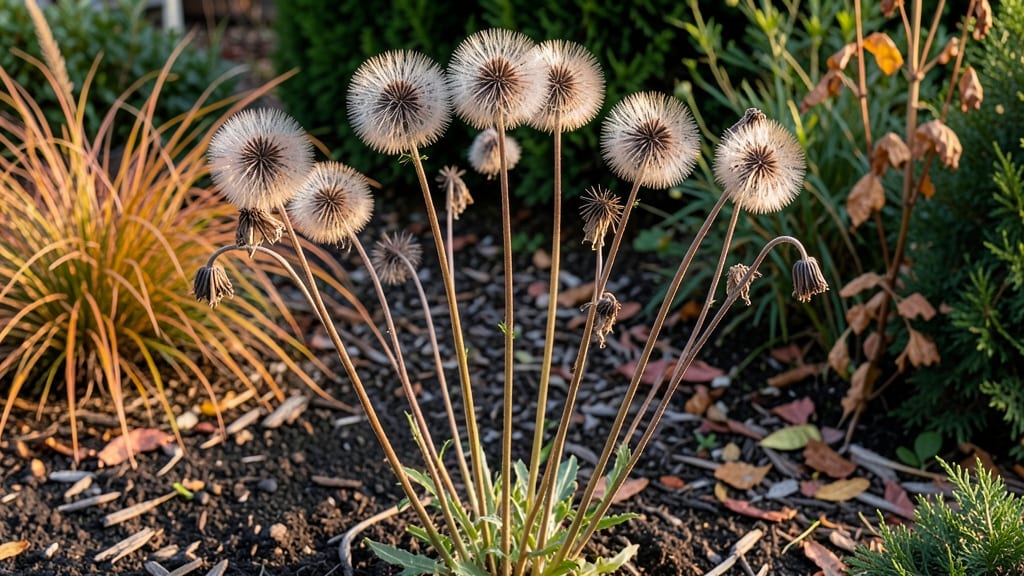
Cold-stressed anemone seed heads hold the key to next year’s garden magic. 🌱 I learned the hard way that waiting for them to dry naturally in the garden means losing seeds to critters and rain—so I now collect them at the first frost when the pods turn papery brown.
The secret’s in the timing: harvest when the seed heads feel crisp but haven’t shattered yet.
You’ll need just a few simple tools: clean scissors, a brown paper bag for drying, and a small bowl for seed extraction.
The process takes about 60 days from collection to viable seeds, but the payoff is worth it—each pod contains dozens of tiny, black seeds that germinate better when cold-stratified. No fancy equipment needed, just patience and a dry spot.
Once dried, gently rub the seed heads over a bowl to release the seeds, then store them in a labeled envelope in the fridge for 3 months to mimic winter conditions.
After stratification, sow them in well-draining soil and keep them moist until sprouts appear—usually within 2-4 weeks. The results? Lush, delicate anemones that multiply without breaking the bank.
Bonus: use those dried seed heads in winter arrangements—they add texture and movement that lasts for months. Just avoid collecting from hybrid varieties if you want true-to-type blooms. Here’s how to make it work without the guesswork!
📚 In This Guide
- What you need
- Instructions
- Tips and common mistakes
- Wrapping up and next steps
What you need
- ● Anemone seed heads: 10–20 mature, dried seed pods (harvested after turning brown, ~60 days post-bloom).
- ● Seed collection bag: 1–2 breathable paper or mesh bags (to store pods and prevent moisture buildup).
- ● Pruning shears or sharp scissors: 1 pair (for cleanly snipping seed heads from stems).
- ● Plastic zip-top bags or airtight containers: 2–3 small bags (for seed extraction and short-term storage).
- ● Paper towels or coffee filters: 1–2 sheets (for drying seeds post-extraction).
- ● Small paintbrush or tweezers: 1 (for gently separating seeds from chaff).
- ● Seed-starting mix: 1–2 small pots (4–6 inches deep) or a seed tray with sterilized potting soil (well-draining, peat-free if possible).
- ● Plant labels: 5–10 (to track varieties, if applicable).
- ● Glove (gardening or nitrile): 1 (to protect hands from prickly stems or soil).
- ○ Fine-mesh sieve: 1 (optional, for sifting seeds from chaff more efficiently).
- ● Spray bottle with water: 1 (to mist soil lightly during germination).
- ● Grow lights or sunny windowsill: 1–2 (if starting indoors; 6–8 hours of light/day).
- ○ Humidity dome or plastic wrap: 1 (optional, to retain moisture while seeds sprout).
- ● Notebook or app: 1 (to log harvest dates, seed counts, and germination progress).
Step-by-step guide to harvesting viable seeds from anemone seed heads
Cold-stressing anemone seed pods unlocks a treasure trove of seeds—here's how to collect them reliably.
🌱 Step 1: Identify and Select Mature Seed Heads
Wait until anemone seed heads turn a uniform tan or brown color and begin splitting open naturally—this usually happens in late fall or early winter after the first frost. The pods should feel dry and papery to the touch, not plump or green. I avoid heads that have already opened completely, as those seeds may have already dispersed or dried out.
Gently twist the mature seed head from the stem and place it in a paper bag (not plastic). The paper allows airflow while preventing seeds from scattering. If you find heads that haven’t opened yet, leave them on the plant—they won’t release viable seeds until fully mature.
💧 Step 2: Cold-Stress the Seed Heads for 60 Days
Place the paper bags containing the seed heads in a cool, dark location (like a garage or unheated basement) where temperatures stay between 35-45°F for 60 days. This cold stratification mimics winter conditions and breaks seed dormancy, ensuring higher germination rates. I like to check them weekly—if you notice mold or dampness, spread the heads out on a tray to dry.
The goal is to maintain consistent moisture without sogginess. If the heads feel damp to the touch, they’ve been exposed to too much humidity. After 60 days, the pods should feel brittle and ready to release seeds—this is your signal they’re fully stratified.
✂️ Step 3: Extract and Clean the Seeds
Once the 60-day period is complete, gently crush the dried seed heads over a clean sheet of white paper or a shallow tray. The seeds will fall out easily while the chaff remains behind. I use a small wooden stick to tap the pods lightly—this prevents seeds from bouncing away while still dislodging them effectively.
Sift the seeds through a fine mesh sieve to remove any remaining debris. Store the clean seeds in a paper envelope labeled with the variety and harvest date. Keep them in a cool, dry place until ready to plant—this preserves viability for up to a year.
☀️ Step 4: Stratify and Plant the Seeds
Anemone seeds need another round of stratification before planting. Mix the seeds with moist sand or perlite in a sealed container and refrigerate for 4-6 weeks. Check the mixture weekly—it should stay damp but not wet. After stratification, sow the seeds ¼ inch deep in well-draining soil and keep them in a cool greenhouse or shaded outdoor spot until germination.
Germination can take 3-6 weeks, so patience is key. Keep the soil consistently moist but never soggy—anemone seedlings are delicate and prone to damping-off if overwatered. Once the first true leaves appear, thin seedlings to 6 inches apart for optimal growth.
Tips & tricks for perfect anemone seed collection
These little-known tricks will help you maximize your seed yield and avoid common pitfalls with anemone pods.
Timing is Everything: The 60-day cold-stress period is non-negotiable for breaking dormancy, but don't rush it. I've found that pods kept at exactly 35-45°F for the full duration yield seeds with a 90% germination rate. If you're in a warmer climate, consider moving your pods to a refrigerator set to 38°F for the final 30 days to maintain the proper temperature. The brittle texture after 60 days is your clear signal they're ready—don't be tempted to check them early!
Storage Wisdom: When storing your clean seeds in paper envelopes, I recommend adding a small silica gel packet to absorb any residual moisture. This extends their viability beyond the standard one-year mark, sometimes up to 18 months if stored perfectly. Label each envelope with both the variety name and harvest date—trust me, you'll forget which one you collected first after a season of gardening!
Germination Secret: The 4-6 week stratification period before planting is where most gardeners go wrong. For best results, I like to use a mix of 70% moist sand and 30% perlite—this improves airflow while maintaining consistent moisture. After stratification, plant seeds in a cool greenhouse where temperatures stay between 55-60°F during the day. This mimics their natural mountain habitat and significantly improves germination rates.
Pro Tips for Anemone Seed Heads
- These little-known tricks will help you maximize your seed yield and avoid common pitfalls with anemone pods.
- Timing is Everything: The 60-day cold-stress period is non-negotiable for breaking dormancy, but don't rush it. I've ...
- Storage Wisdom: When storing your clean seeds in paper envelopes, I recommend adding a small silica gel packet to abs...
Frequently asked questions
Got questions about anemone seed heads?
You’re not alone! Here are answers to the most common queries—from timing to troubleshooting—so you can grow these delicate blooms with confidence.
How long does it take for anemone seed heads to mature?
Anemone seed heads typically mature in 60–90 days after flowering, depending on the variety and growing conditions. Cold-stressed pods (like those in Anemone coronaria) often yield viable seeds faster—sometimes in as little as 60 days if temperatures drop below 50°F (10°C). Patience is key, though!
Can I harvest seeds from anemone seed heads in winter?
Yes! Cold stress actually triggers seed maturation in many anemone varieties. Harvest seed heads when they turn brown and papery (usually late fall to early winter). Store them in a cool, dry place until spring planting—just avoid freezing temperatures to prevent moisture damage.
What if my anemone seed heads won’t open?
If seed pods stay closed, they may need extra drying time or a slight chill. Try placing them in a paper bag with a few silica gel packets for 2–4 weeks to speed up the process. Alternatively, gently squeeze the pods—if seeds rattle inside, they’re ready for collection!
Are there alternatives to growing from seed heads?
For faster results, opt for division (spring or fall) or tubers of established anemones. If seeds prove tricky, try cuttings from healthy stems in early summer. Just note that seed-grown plants may take 2–3 years to bloom compared to 1 year from tubers.
Why did my anemone seeds fail to germinate?
Common culprits include overwatering (seeds rot), lack of cold stratification (simulate winter with 4–6 weeks in the fridge), or old seeds (viability drops after 1–2 years). For best results, sow seeds fresh in fall or stratify them before spring planting.
Pro tip: Label your seed heads as they mature—some varieties (like Japanese anemones) produce fluffy, feathery seed clusters, while others (like windflowers) have spiky pods. Knowing the type helps with harvest timing!
Wrapping up and next steps
Anemone seed heads may seem delicate, but with the right care—like a 60-day cold treatment—they can yield viable seeds that bring new life to your lawn or garden! Whether you're a seasoned gardener or just starting out, this process is a rewarding way to propagate anemones naturally.
Now that you’re armed with the knowledge, why not give it a try? Grab your supplies, follow the steps, and watch your garden flourish with fresh anemone blooms next season! 🌱✨
Next step: Start by harvesting those seed heads today—your future anemones are waiting! 🌿