
Lawn
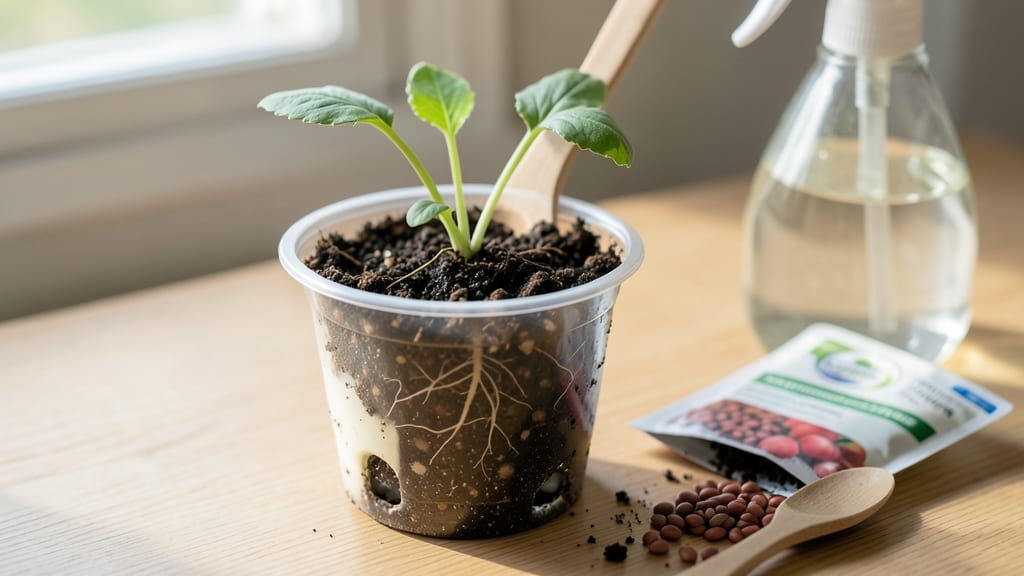
A single seed in a cup can start a gardening revolution on your balcony. 🌱 This zero-waste method lets you grow herbs, lettuce, or beans without soil mess, perfect for small spaces where every inch counts.
I've watched my windowsill transform from bare to lush in just two weeks using this simple approach. All you need is a clear plastic cup, a paper towel, a seed, and a spray bottle—no fancy tools required. The process is forgiving, even for those of us who've killed plants before.
You'll see roots forming within days, and with the right light, your first true leaves appear faster than you'd expect. By the time you're ready to transplant (if you choose), you'll have a sturdy seedling with a head start on growth. The best part?
No wasted soil or containers—just a clean cup that can be reused or composted. Beginner-friendly seeds like basil, radishes, or bush beans thrive in this setup, giving you confidence for bigger projects later. This method teaches kids (or adults!) about plant growth while saving space and resources.
Ready to turn that empty cup into a thriving mini-garden? Let's get those seeds sprouting!
📚 In This Guide
- What you need
- Instructions
- Tips and common mistakes
- Wrapping up and next steps
What you need
- ● 1 small clear plastic cup (4–6 oz, with drainage holes—poke 2–3 if none exist!)
- ● 1 seed (fast-growing options: radish, lentil, or sunflower—check seed packet for sprouting time)
- ● Water (room-temperature, filtered if possible)
- ● 1 paper towel or coffee filter (cut to fit cup bottom)
- ● 1 rubber band or string (to secure the filter)
- ● 1 sunny windowsill or grow light (4–6 hours of indirect light daily)
- ● Small plate or saucer (to catch drainage)
- ● Spray bottle (for gentle misting)
- ● Organic soil or compost (if transplanting later)
- ● Label & marker (to track seed type)
- ● Humidity dome (DIY with plastic wrap + rubber bands)
Step-by-Step instructions for growing seeds in cups
Here's how to grow strong seedlings using just a cup—no mess, no waste, and perfect for small spaces.
🌱 Step 1: Choose Your Cup and Prepare the Seed
Grab a clean, sturdy paper cup—no plastic needed! Poke 4-6 drainage holes in the bottom with a nail or scissors. This keeps roots from sitting in water, which causes rot. I like to use 16-ounce cups because they give roots plenty of room to grow without being too bulky.
Soak your seed overnight in lukewarm water for 8-12 hours. This softens the outer shell so it germinates faster. Drain well before planting—you don’t want soggy seeds. For example, if growing beans, place 2-3 seeds near the cup’s inner edge, about ½ inch deep. Press gently but don’t pack the soil too tight.
💧 Step 2: Fill the Cup with Moist Soil and Plant
Fill the cup ¾ full with light potting mix—avoid garden soil, which is too heavy. Moisten it until damp like a wrung-out sponge. Press the soil down lightly so it stays in place, but don’t compact it too much. Roots need air to breathe!
Place the soaked seeds on top of the soil, then cover them with ¼ inch of mix. Gently pat the soil to secure the seeds. If using a clear cup, you’ll see roots growing through the sides—that’s a cool way to track progress! Water lightly until the soil feels evenly moist but not soggy.
☀️ Step 3: Place in Bright, Indirect Light
Set your cup in a spot with bright, indirect light—like a windowsill facing east or west. Avoid direct midday sun, which can overheat the cup and dry out the soil too fast. If your space is dim, use a grow light placed 6 inches above the cup for 12-14 hours daily. You’ll know it’s working when the seedling’s first leaves (called cotyledons) appear in 7-14 days.
Keep the soil consistently moist—not dripping wet, not bone dry. Stick your finger in the soil: if the top ½ inch feels dry, water gently. Overwatering is the #1 killer of young seedlings, so let excess water drain out the holes completely.
✂️ Step 4: Thin and Transplant When Ready
Once the seedling has 2-3 true leaves (not the first cotyledons), it’s time to thin. Use scissors to snip the weakest stem at soil level, leaving the strongest one. This gives your plant room to grow without competing for nutrients. If using a clear cup, you can even transplant the whole root ball into a larger pot later—no need to disturb the roots!
When the seedling reaches 3-4 inches tall, it’s ready to move outdoors or into a bigger container. Harden it off first by placing it outside for 1-2 hours daily over 5-7 days, gradually increasing time. Watch for strong stems and vibrant leaves—that’s your sign it’s thriving!
🪴 Step 5: Repurpose the Cup (Zero-Waste Bonus!)
Once your plant outgrows the cup, compost the paper—it breaks down easily! For a second round, reuse the cup by washing it thoroughly and repeating the process. I’ve grown herbs, lettuce, and even small flowers this way with zero waste. Just remember: no plastic cups—they don’t break down and can harm soil.
This method is perfect for balcony gardens, small apartments, or teaching kids about plant growth. The best part? You’ll have a ready-to-transplant seedling in just a few weeks—no fuss, no clutter!
Tips & tricks for perfect seed sprouting in cups
Here's what nobody tells you about growing seeds in cups—these tricks will help you avoid common pitfalls and get stronger seedlings every time.
Soaking Secret: The 8-12 hour soaking time is crucial, but don't skip draining! After soaking, place your seeds on a paper towel to drain for 10 minutes. This prevents soggy seeds that can rot before they even sprout. I've ruined three batches by skipping this step—don't make my mistake! For larger seeds like beans, you can even lightly rub the seed coat with sandpaper to help water penetrate faster.
Drainage Matters: When poking those 4-6 drainage holes in Step 1, make them slightly larger than you think you need. The holes can get clogged with soil over time, and you don't want water sitting at the bottom. I use a nail to make holes about ⅛-inch wide—just enough to let water flow freely. If you're worried about the cup falling apart, reinforce the bottom with a piece of cardboard before poking holes.
Lighting Hack: That 12-14 hours of grow light is perfect, but position it just right. Place the grow light so it's 6 inches above the cup's rim—not the soil level. This prevents the leaves from stretching toward the light (called etiolation) and keeps them growing strong and sturdy. If using natural light, rotate your cup daily so all sides get equal exposure—this prevents lopsided growth.
Transplanting Trick: When it's time to transplant that 3-4 inch seedling, use the cup's edge as a guide. Gently press the cup against the soil in its new pot—the roots will slide right out without damage. This works especially well with clear cups where you can see the root development. For herbs like basil, you can even plant the whole cup in the ground and let it break down naturally—no transplant shock!
Pro Tips for Growing A Seed In A Cup
- Here's what nobody tells you about growing seeds in cups—these tricks will help you avoid common pitfalls and get str...
- Soaking Secret: The 8-12 hour soaking time is crucial, but don't skip draining! After soaking, place your seeds on a ...
- Drainage Matters: When poking those 4-6 drainage holes in Step 1, make them slightly larger than you think you need. ...
Frequently asked questions
Got questions about sprouting seeds in a cup? You’re not alone—this zero-waste method is simple but can spark curiosity! Here are answers to the most common queries to help you grow like a pro.
How long does it take for seeds to sprout in a cup?
Most seeds (like radishes, lentils, or alfalfa) sprout in 3–7 days when kept in a warm, dark place. Check daily—once the sprout reaches 1–3 inches, it’s ready to transfer to a sunny spot or eat! Fast-growing seeds (e.g., broccoli) may sprout in 2–3 days, while slower ones (like sunflower) take 7–10 days.
What if my seeds aren’t sprouting? Troubleshooting tips!
Don’t panic—here’s how to fix common issues:
No sprouts after 7+ days? Try rinsing seeds twice daily (they need hydration!).
Moldy or smelly cup? Drain excess water and rinse with 1 tsp vinegar per cup of water to kill bacteria.
Seeds drying out? Soak them in warm water for 6–8 hours before starting or cover the cup with a damp paper towel.
Leggy or weak sprouts? Move the cup to bright, indirect light (no direct sun yet!).
Can I eat sprouts grown in a cup? Are they safe?
Sprouts from a cup are nutrient-packed and safe if you follow these rules:
- Use organic, raw seeds (non-GMO preferred) to avoid pesticides.
- Rinse sprouts thoroughly before eating to remove bacteria.
- Avoid eating alfalfa, clover, or radish sprouts if you’re immunocompromised (they’re higher-risk).
- Store sprouts in the fridge for 3–5 days in a breathable container.
What other seeds can I grow in a cup besides standard sprouts?
You’re not limited to lentils or alfalfa! Try these easy, edible seeds for your cup garden:
Seed Type
Sprout Time
Best For
Broccoli
3–5 days
Salads, stir-fries (peel outer layer)
Sunflower
7–10 days
Crunchy snacks, hummus topping
Pea shoots
5–7 days
Gourmet garnishes, sandwiches
Chia
2–3 days
Pudding, smoothies, yogurt topper
Mustard
4–6 days
Spicy kick for soups, wraps
Pro tip: Start with small seeds (like chia or radish) if you’re a beginner—they’re forgiving!
What do I do with the cup after sprouting?
Zero-waste hero mode activated! Here’s how to repurpose your cup:
- Compost it: If it’s paper or biodegradable, toss it into your compost bin.
- Reuse it: Clean and reuse for new sprouts or as a mini planter for herbs.
- Recycle: Plastic cups? Rinse and recycle—just skip the compost!
- Upcycle: Turn it into a succulent holder or DIY seed-starter for bigger plants.
Wrapping up and next steps
Growing a seed in a cup isn’t just a fun, zero-waste experiment—it’s a small but mighty step toward a greener home and balcony! Whether you’re sprouting herbs for cooking, flowers for pollinators, or veggies for salads, this method proves that anyone can nurture life with minimal space and effort. 🌱
Now that you’re ready to start, why not take it further? Try experimenting with different seeds, track your plant’s growth in a journal, or share your cup garden with neighbors to inspire more sustainable habits. Every seed you grow is a seed of change—keep planting!