
Lawn
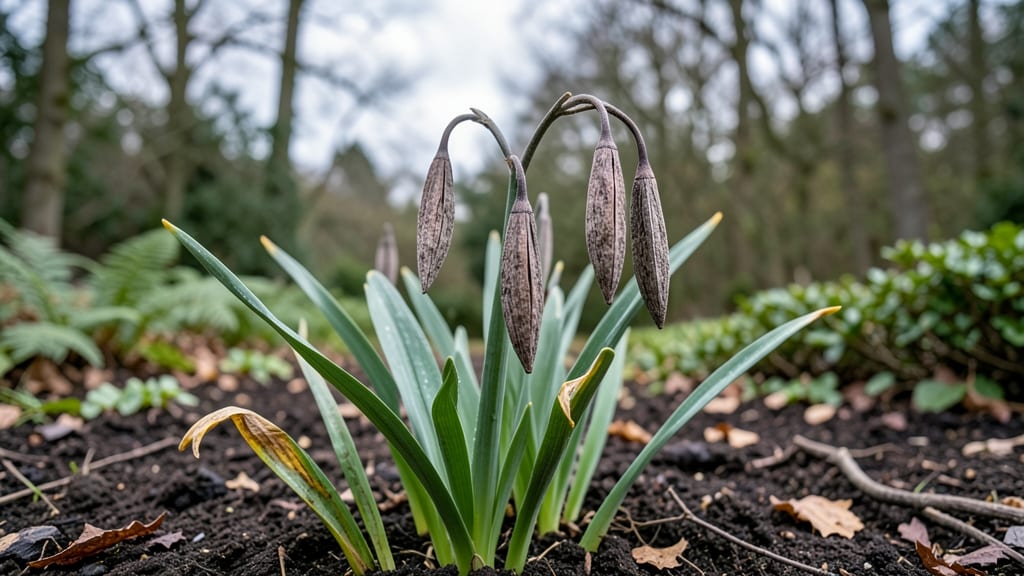
Collecting daffodil seed pods unlocks free blooms for next spring—but only if you handle them right. ✨ The key is timing: pods must mature fully before turning brown and papery, or the seeds inside won’t survive.
I’ve learned the hard way that rushing harvests means wasted effort, but with patience, you’ll get plants that multiply your garden’s beauty naturally.
Start by identifying pods on your healthiest blooms—they’ll be the largest and most upright. Once they’re completely dry and split open, gently twist them off the stem and store them in a paper bag for a week to finish drying.
The real magic happens next: cold-stratification mimics winter, breaking dormancy so seeds germinate reliably. A simple DIY method uses a sealed bag of moist peat moss in the fridge for 60 days, but outdoor planting works too if your climate freezes.
You’ll see tiny sprouts in 4-8 weeks after planting, though seed-grown daffodils take 3-5 years to bloom compared to bulb offsets. The tradeoff? Unique colors and patterns you won’t find in nurseries, plus the thrill of growing something entirely from scratch.
Just don’t expect instant gratification—this is a long-term investment in your garden’s future.
For best results, plant seeds in well-draining soil and mark their location. Mulch lightly to retain moisture until they establish. While seed propagation is slower than dividing bulbs, the satisfaction of watching your own daffodils mature makes it worth every step.
Here’s how to avoid the most common pitfalls and set yourself up for success.
📚 In This Guide
- What you need
- Instructions
- Tips and common mistakes
- Wrapping up and next steps
What you need
- ● Mature daffodil seed pods: Collect 10–20 healthy, fully ripened pods (brown, papery texture) from your garden or a trusted source.
- ● Pruning shears or sharp scissors: 1 pair (sterilized with rubbing alcohol for hygiene).
- ● Paper bags or breathable mesh bags: 2–3 medium-sized bags (to store pods while drying).
- ● Newspaper or cardboard: 1–2 sheets (for drying surface).
- ● Plastic container with lid: 1 (for cold stratification storage—use a sealed, airtight container like a Tupperware).
- ● Potting soil: 1 bag (well-draining, sterile mix for planting next spring).
- ● Small pots or seed trays: 5–10 (3–4 inches deep, with drainage holes).
- ● Refrigerator or cold storage unit: Set to 34–40°F (1–4°C) for 60 days.
- ● Moistened paper towels: 2–3 sheets (to lightly dampen pods before storage).
- ● Labeling tags & marker: For tracking pod varieties and harvest dates.
- ● 🌡️ Harvest pods when they’re fully brown and dry—this ensures maximum viability.
- ● ✨ Skip the cold stratification step if your climate has naturally cold winters—plant pods outdoors in fall instead.
- ● 🔥 Store pods in a cool, dry place until ready to stratify (up to 2 weeks).
How to cold-stress daffodil seed pods for next year’s blooms
Turn this year’s spent daffodil pods into next season’s flowers with a simple cold-stress trick.
🌱 Step 1: Harvest and Prepare the Seed Pods
Wait until the seed pods turn brown and papery—usually 4-6 weeks after flowering—before harvesting. Use clean scissors to snip the pods from the stem, leaving a short stalk. Remove any dried leaves or debris clinging to them. I like to spread them on a clean, dry surface for a few hours to let any lingering moisture evaporate naturally.
This drying step prevents mold during cold storage. If pods feel damp to the touch, let them air out a bit longer. You’ll know they’re ready when the outer casing feels crisp and brittle. Store them in a paper bag (not plastic) to allow airflow—this mimics their natural environment.
💧 Step 2: Stratify the Pods for 60 Days
Place the dried pods in a sealed plastic bag with a moistened paper towel at the bottom. The towel should feel damp but not soggy—like a wrung-out sponge. Seal the bag loosely (leave a tiny gap for airflow) and place it in the coldest part of your fridge, ideally around 35-40°F. This mimics winter conditions and breaks seed dormancy.
Check the pods every 2 weeks to ensure the towel stays moist. If it dries out, spritz it lightly with water and reseal. After 60 days, the pods should feel slightly softer and may even crack open slightly—this is the signal they’re ready for planting. Don’t rush this step; cold-stressing is what ensures strong germination.
☀️ Step 3: Plant the Stratified Seed Pods
Once the 60-day period is up, open the pods carefully with your fingers or a small knife. Inside, you’ll find flat, dark seeds—each one a potential next-year bloom. Plant them ½ inch deep in a well-draining soil mix (I use a blend of potting soil and perlite). Space them 1-2 inches apart in a small pot or directly in the garden bed.
Water gently but thoroughly, ensuring the soil is moist but not waterlogged. Place the pot or bed in a bright, indirect light spot (like a shaded windowsill or under a tree). Keep the soil consistently moist—not soggy, not dry—until germination, which can take 4-8 weeks. Patience is key here; daffodil seeds are slow starters.
⏰ Step 4: Transition to Outdoor Conditions
After the first true leaves appear (they’ll look like tiny grass blades), it’s time to harden off the seedlings. If planting in a pot, move it outside to a sheltered, shaded spot for 1-2 hours the first day. Gradually increase exposure over 7-10 days, ending with full sun. For garden beds, simply ensure the soil stays moist during this transition.
Daffodils need full sun to thrive, but young seedlings can scorch in intense afternoon heat. Watch for wilting or yellowing leaves—this is your cue to provide a bit more shade or water. Once the seedlings are 3-4 inches tall, they’re ready to handle full sun and outdoor conditions year-round.
Tips & tricks for perfect daffodil seed pod cold-stressing
Here's what nobody tells you about making this process foolproof.
Timing Secret: Harvest your daffodil pods when they're fully brown and papery—this usually happens about 4-6 weeks after the flowers fade. I learned this the hard way after trying to harvest too early and dealing with moldy pods later. The crisp, brittle texture is your cue they're ready for storage. If you're unsure, give them another week—the extra wait prevents future headaches.
Storage Wisdom: That paper bag isn't just for looks—it's crucial for airflow while preventing pests. I've seen people use plastic bags, but condensation builds up and creates the perfect environment for mold. If you're short on paper bags, a breathable mesh produce bag works too. Just avoid anything that traps moisture. Remember to store them in a cool, dry place (like your garage or basement) until you're ready to start the cold-stressing process.
The Temperature Matters: Your fridge's coldest spot is ideal for the 35-40°F range, but not all fridges are created equal. If your fridge runs cooler (say, 30°F), that's actually fine—daffodil seeds are tough little things. The key is consistency. I've had success using the crisper drawer too, as long as it stays between 35-45°F. Avoid temperature swings, which can confuse the seeds and reduce germination rates.
Visual Cues for Success: After those 60 days, you'll notice the pods softening slightly—this is exactly what you want! They might even start cracking open on their own. If you're impatient and open them early, you'll find the seeds still firm and unready. Wait until you can gently press the pods and feel them give slightly. This softening indicates the seeds have completed their dormancy cycle and are ready for planting.
Pro Tips for Daffodil Seed Pods
- Here's what nobody tells you about making this process foolproof.
- Timing Secret: Harvest your daffodil pods when they're fully brown and papery—this usually happens about 4-6 weeks af...
- Storage Wisdom: That paper bag isn't just for looks—it's crucial for airflow while preventing pests. I've seen people...
Frequently asked questions
Got questions about harvesting and storing daffodil seed pods for next year’s blooms? You’re not alone! Here are some of the most common queries—and their straightforward answers—to help you master the process.
When is the best time to collect daffodil seed pods?
Harvest seed pods after they’ve fully matured but before they split open naturally. Aim for late summer to early fall (August–September), when the pods turn brown and papery but haven’t released seeds. Wait too long, and the seeds may scatter—or worse, sprout too early!
Why do daffodil seeds need cold stratification?
Cold stratification mimics winter’s chill, breaking seed dormancy so they germinate properly. Without it, seeds may stay dormant or sprout weakly. Store pods in a dry, cold place (like a fridge) for 60 days to mimic nature’s timing—just like bulbs need!
Can I plant daffodil seeds directly where I collected the pods?
Yes, but timing matters! Plant seeds outdoors in fall (after stratification) for spring germination. For faster results, sow in a seed-starting tray first (indoors, 8–10 weeks before last frost). Just ensure soil stays moist but not soggy—seeds need patience!
What if my seed pods won’t open naturally?
If pods stay closed, gently crack them open with a clean knife or let them air-dry in a paper bag for a few days. Avoid forcing them—seeds inside may still be viable. If pods are moldy or mushy, discard them (they’re past their prime!).
Will seeds from my daffodils grow into identical blooms?
Probably not! Seed-grown daffodils often produce variations in color, size, or hardiness. For true-to-type blooms, divide mature bulbs instead. But the fun? Unexpected surprises—maybe a rare double-flowered or striped daffodil!
Pro Tip:
Label your seed pods with the parent plant’s name or traits (e.g., “April Snow”). This helps track which varieties thrive—and which might need a second try! A simple toothpick + masking tape works perfectly.
Wrapping up and next steps
Growing daffodil seed pods to maturity in just 60 days is a rewarding way to ensure vibrant blooms next spring!
By following the right steps—harvesting, cold-stressing, and nurturing—you’re not just saving money, you’re unlocking a sustainable way to expand your garden. Your patience today will pay off with cheerful yellow and white flowers tomorrow!
Ready to dive deeper? Start by gathering your supplies and give it a try—your future garden will thank you! 🌱✨