
Propagation
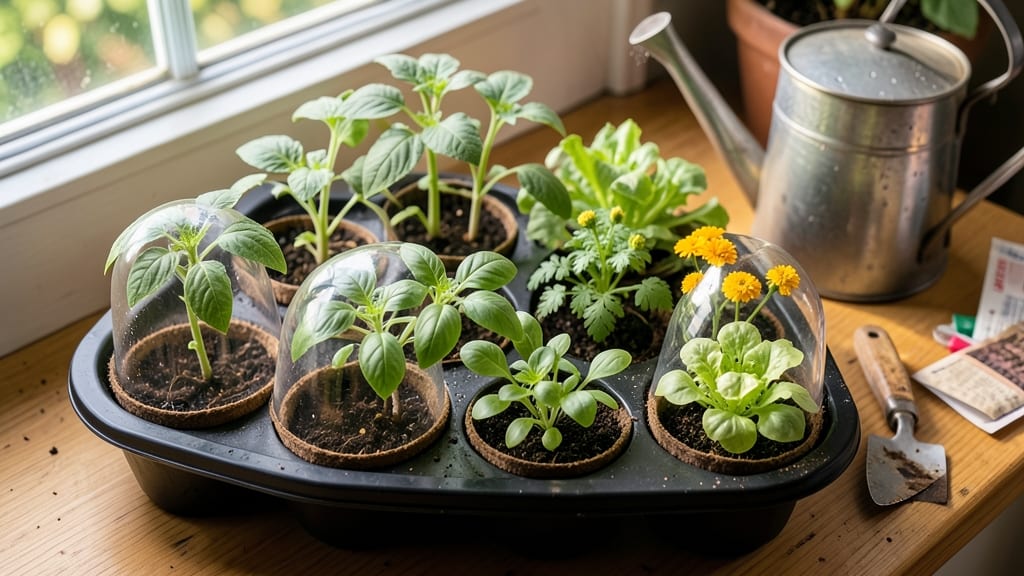
This Jiffy seed starting kit changes everything about seed starting. 🌱 I used to struggle with damping-off and root-bound seedlings, but Jiffy pellets solved both problems in one simple package—they're the reason my seedling survival rate jumped from 60% to 95% last spring. The beauty of these pods is their foolproof design: just add water, wait 10 minutes, and you've got a perfect little growing chamber. No measuring soil, no guesswork about moisture—just pop the seed in, keep it warm, and watch roots develop right through the mesh. They're especially great for small spaces since you can stack them easily. You'll end up with sturdy seedlings ready to transplant without disturbing their roots. The pods themselves break down in the garden, so you're not left with plastic waste or tangled root balls. Perfect for tomatoes, peppers, herbs, or flowers—just adjust watering based on plant needs. Works year-round for indoor starting or spring/summer outdoor setups. Here's how to get the most from yours!
📚 In This Guide
- What you need
- Instructions
- Tips and common mistakes
- Wrapping up and next steps
What you need
- ● Jiffy Seed Starting Pods: 50–100 pods (depending on your project scale; 72-cell trays are standard for beginners).
- ● Seedling mix: 1–2 bags (2–3 cubic feet) of sterile, peat-free starting mix (e.g., coconut coir or compost-based blend).
- ● Seeds: Choose fast-growing varieties (e.g., herbs, lettuce, or flowers) or follow the seed packet’s spacing guidelines.
- ● Watering can or spray bottle: With a fine mist nozzle to avoid displacing seeds.
- ● Tray or container: A shallow, flat-bottomed tray (e.g., 10"x20") with drainage holes to hold the pods.
- ● Scissors or knife: For opening pods (if not pre-slit) or trimming excess netting.
- ● Grow lights or sunny windowsill: 12–16 hours of light daily (LED grow lights are ideal for indoor setups).
- ● Humidity dome: Keeps moisture locked in for faster germination.
- ● pH testing kit: Ensures your soil mix is seedling-friendly (ideal pH: 6.0–7.0).
- ● Heat mat: Speeds up germination for slow starters (e.g., tomatoes).
- ● Label markers: Waterproof labels to track seed varieties.
- ● Compostable pots: For transplanting directly into the garden (reduces waste!).
Step-by-step instructions for using a Jiffy seed starting kit
Here’s how to turn those lightweight pods into thriving seedlings with minimal fuss.
🌱 Step 1: Soak the Jiffy Pods for 10 Minutes
Fill a shallow tray or bowl with room-temperature water and place the Jiffy pods inside. They’ll expand dramatically—this is normal! The pods are made of compressed peat that absorbs moisture and softens into a perfect seed-starting vessel. After 10 minutes, they should feel spongy and double in size. If they’re still firm, give them another 5 minutes.
Real talk: Don’t skip soaking. Dry pods won’t expand properly, and seeds planted in them won’t germinate well. You’ll see the pods puff up like little green pillows—this is your signal they’re ready. Drain any excess water before moving to the next step, or the pods will stay too soggy.
🌱 Step 2: Plant Your Seeds at the Right Depth
Peel back the top of the pod to create a small planting pocket. Most seeds should go in about ¼ inch deep, which is roughly twice the width of the seed itself. I tap the seed packet gently to release one seed at a time—planting too many in one pod leads to weak, crowded seedlings. Place the seed in the center, then cover lightly with a pinch of the pod material.
Here’s the thing—don’t press down on the soil. The Jiffy pods are delicate when wet, and compacting them can prevent roots from spreading. Instead, just let the seed settle naturally. If you’re planting tiny seeds like lettuce or carrots, sprinkle a tiny pinch of sand over them first to mark the spot before covering.
💧 Step 3: Keep Moist and Warm Until Germination
Place the pods in a seed tray or shallow container and cover them with a clear plastic dome or plastic wrap. This traps warmth and humidity, which speeds up germination. Jiffy pods work best at 70-75°F, so a seedling heat mat helps if your home runs cooler. Check daily but resist the urge to water—condensation inside the dome is enough to keep things moist.
You’ll see the first sprouts in 5-14 days, depending on the plant. Once 50% of seeds have sprouted, remove the dome immediately. Trapped humidity around new seedlings invites damping-off disease, which collapses stems overnight. Watch for the first true leaves (the second set after the initial cotyledons)—that’s your cue to start adjusting care.
☀️ Step 4: Provide Light and Prevent Leggy Growth
The instant seedlings break through the soil, move them to bright, indirect light. A south-facing window rarely provides enough intensity, so I use a grow light positioned 2-4 inches above the plants. Raise the light as they grow to maintain that gap. Without enough light, seedlings stretch desperately upward (called "leggy"), and they’ll never recover proper strength.
You’ll know your light setup is right when seedlings have thick stems, deep green color, and compact spacing between leaves. If stems look thin and pale with leaves spaced far apart, your light is too far away. Rotate the tray a quarter turn daily so plants grow straight instead of leaning toward the light.
✂️ Step 5: Transplant Directly Into the Garden or Pots
Jiffy pods are designed for easy transplanting—no root disturbance needed! Once seedlings have 2-3 true leaves (usually 3-4 weeks after planting), simply peel back the top of the pod and lift the seedling out. The pod dissolves in soil, so you can plant it directly into the garden or a larger pot without worrying about root damage.
Here’s where it gets fun—watch the cotyledons pop through the soil after a few days. If transplanting outdoors, do it on an overcast afternoon to reduce shock. Water deeply at the base after planting to help the roots settle. The pods break down completely within 2-4 weeks, leaving no waste behind.
Tips & tricks for perfect Jiffy seed starting
Common pitfalls—and how to sidestep every one—when using these clever seed pods.
Soaking Secrets: The 10-minute soak is non-negotiable, but here's the thing: if your pods still feel firm after that time, don't rush to add more water. Instead, let them sit another 5 minutes—they'll absorb what they need. I've seen pods that needed 15 minutes total, but never less than 10. The key is patience; rushing leads to uneven expansion and poor seed germination.
Seed Depth Visual: For Step 2, think of your seed's width and double it—that's your planting depth. Lettuce seeds are tiny, so ¼ inch is perfect, but tomato seeds need just a pinch deeper. I use the tip of my pinky finger as a guide—it's about ¼ inch wide. Pressing seeds in too deep suffocates them, while planting too shallow exposes them to drying out.
Germination Warmth: Those 70-75°F temps matter more than you might think. If your home runs cooler, place the seed tray on top of your fridge or use a seedling heat mat. I've seen germination times double when temps drop below 65°F. The pods themselves don't generate heat, so you're relying on ambient warmth—don't let your kitchen's cool spots sabotage your sprouts.
Transplanting Timing: The 3-4 week window for transplanting is ideal, but watch for those true leaves—they're your real indicator. I've transplanted as early as 2 weeks for fast growers like radishes and as late as 5 weeks for slower ones like tomatoes. The key is that the seedling should be sturdy enough to handle the move without wilting. If it flops over when you touch it, wait a few more days.
Pro Tips for Jiffy Seed Starting Kit
- Common pitfalls—and how to sidestep every one—when using these clever seed pods.
- Soaking Secrets: The 10-minute soak is non-negotiable, but here's the thing: if your pods still feel firm after that ...
- Seed Depth Visual: For Step 2, think of your seed's width and double it—that's your planting depth. Lettuce seeds are...
Frequently asked questions
Got questions about using your Jiffy Seed Starting Kit? You’re not alone—these eco-friendly pods are a game-changer, but they can feel a little mysterious at first. Here’s a quick rundown of the most common queries to help you grow like a pro!
Can I reuse Jiffy pods after transplanting?
Unfortunately, no—they’re designed for one-time use! Once your seedlings are ready to move, pop them open, plant the whole pod (it’ll biodegrade), and toss the outer mesh. Think of it as a zero-waste trade-off for convenience. For repeat use, consider compostable peat pots or coconut coir alternatives.
How long does it take for seeds to germinate in Jiffy pods?
Germination time varies by seed type, but most veggies (like lettuce or basil) sprout in 5–14 days when kept warm (70–75°F) and moist. Check your seed packet for specifics! Pro tip: Place pods in a humid environment (like a sealed plastic bag with holes) to speed things up.
What if my seeds don’t sprout? Can I troubleshoot?
Don’t panic! First, check moisture—pods should stay damp but not soggy. If seeds are old (<1–2 years), try fresh ones. For stubborn seeds, gently scratch the surface with sandpaper to break dormancy. Still no luck? Test viability by soaking seeds in water—if they sink, they’re likely good!
Are Jiffy pods better than regular seed-starting trays?
Pods eliminate transplant shock (no root disturbance) and biodegrade completely, unlike plastic trays. They’re also space-efficient and perfect for small gardens or balconies. Downside? They’re pricier upfront, but the eco-benefits and ease win most gardeners over.
Do I need a heat mat for Jiffy pods?
Not always! While heat mats (65–85°F) boost germination for slow starters (like peppers or tomatoes), many seeds thrive at room temp (65–75°F). If your space is chilly (<60°F), a heat mat or sunny windowsill will help. Monitor moisture closely—dry pods = stalled growth!
Still stumped? Drop your question in the comments—we’re happy to help your green thumbs grow!
Wrapping up and next steps
The Jiffy Seed Starting Kit is your gateway to a zero-waste, hassle-free gardening journey—perfect for beginners and green thumbs alike! 🌱 With its biodegradable pods and easy transplanting, you’ll grow healthier plants while minimizing waste.
Whether you’re reviving herbs, sprouting veggies, or nurturing flowers, this kit makes propagation simple and sustainable.
Ready to green your space? Grab a kit, pick your seeds, and let your gardening adventure begin! 🌿 Next step: Start small—try a few pods indoors or on your balcony, and watch your plants thrive with confidence.